
Connect Open WebUI to SciSure Research
SciSure MCP: Overview · ChatGPT (OpenAI) · Claude · LM Studio · Open WebUI · Other MCP applications
Add SciSure Research as an MCP tool in Open WebUI, secure the connection with OAuth 2.1, and start working with the research data you are already authorized to access.
Requirements for connecting to SciSure MCP
SciSure MCP requires a Private Cloud or On-premises SciSure Research environment. It is not available on the shared Cloud.
The setup joins three parts: your Open WebUI installation, an OAuth client in SciSure Research, and the MCP endpoint on your SciSure tenant.
- Open WebUI admin access — You need access to the Admin Panel and the public URL users use to reach Open WebUI.
- SciSure group settings — You need permission to create an OAuth2 client and choose its read scopes.
- Your tenant URL — Have the base URL for the SciSure Research environment you want to connect.
How the connection works: Open WebUI → OAuth 2.1 → SciSure MCP
1. Start with an existing Open WebUI installation
This tutorial expects Open WebUI to be installed, running, and reachable on your network.
WEBUI_SECRET_KEY is requiredA persistent
WEBUI_SECRET_KEYmust already be defined for the Open WebUI installation. Without it, Open WebUI does not allow an MCP connection to be configured. If you do not manage the installation, ask your Open WebUI administrator to confirm this before continuing.
Administrator: view a Docker Compose example
For a Docker Compose deployment, define a strong, stable random value and keep the same value when Open WebUI is restarted or updated.
Docker Compose example
services:
  openwebui:
    image: ghcr.io/open-webui/open-webui:main-slim
    container_name: open-webui
    ports:
      - "3000:8080"
    volumes:
      - open-webui:/app/backend/data
    environment:
      - WEBUI_SECRET_KEY=your_random_secret_here

volumes:
  open-webui:
2. Build the exact callback URL
The Open WebUI connection ID becomes part of the OAuth callback URL. For this guide, use SciSure-MCP and keep the spelling and capitalization consistent.
OAuth redirect URI
https://<your-openwebui-host>/oauth/clients/mcp:SciSure-MCP/callbackReplace <your-openwebui-host> with the hostname users actually use to open Open WebUI. Include a non-default port if your public URL uses one.
Connection ID vs. Client IDThe Open WebUI connection ID and the OAuth Client ID are different values.
SciSure-MCPidentifies the connection inside Open WebUI; the OAuth Client ID is created in SciSure and entered as a credential in step 4.
3. Register Open WebUI in SciSure Research
In SciSure Research, go to Group Settings → OAuth2 Clients and add a new application.
- Enter a recognizable Application name and Client ID.
- Paste the redirect URI from step 2 into Redirect URIs.
- Select the required scopes. Use Read only when the connection only needs to retrieve data.
- Create the application and retain the Client ID and Client Secret for step 4.
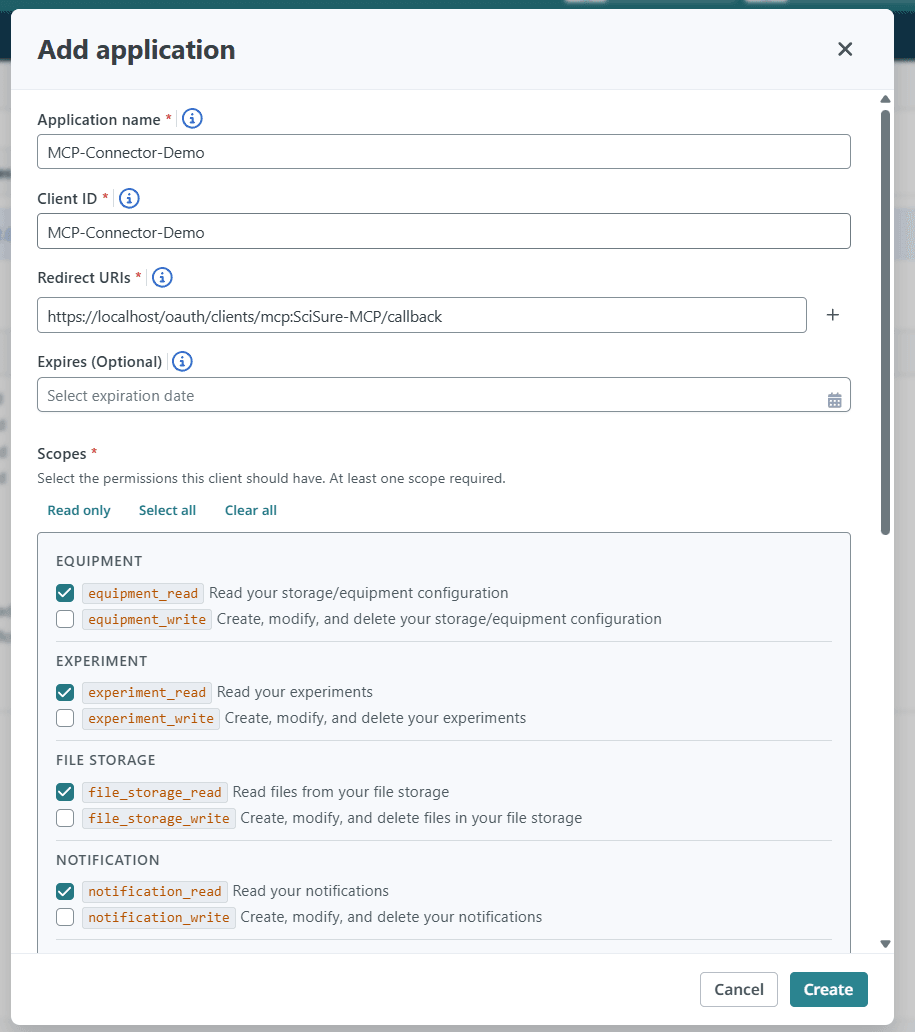
Add the callback URI and select the read scopes the Open WebUI connection needs.
Copy the callback URL exactlyA redirect URI mismatch stops authentication. Check the protocol, hostname, optional port, and the
mcp:SciSure-MCPsegment character for character.
4. Configure the connection in Open WebUI
In Open WebUI, go to Admin Panel → Settings → Integrations → External Tool Servers, then select Add (+). Change the type from OpenAPI to MCP Streamable HTTP.
| Field | Value |
|---|---|
| Type | MCP Streamable HTTP |
| Name | SciSure MCP |
| ID | SciSure-MCP |
| URL | https://<your-instance>/api/v1/mcp |
| Auth | OAuth 2.1 (Static) |
| Credentials | Enter the Client ID and Client Secret from the SciSure OAuth2 client. |
Your MCP endpoint: Replace <your-instance> with the base URL you use to sign in to your SciSure Research environment (for example acme.elabnext.com, acme.elabjournal.com, or a custom domain for self-hosted deployments). Your instance also publishes its configuration at <your-instance>/.well-known/oauth-authorization-server.
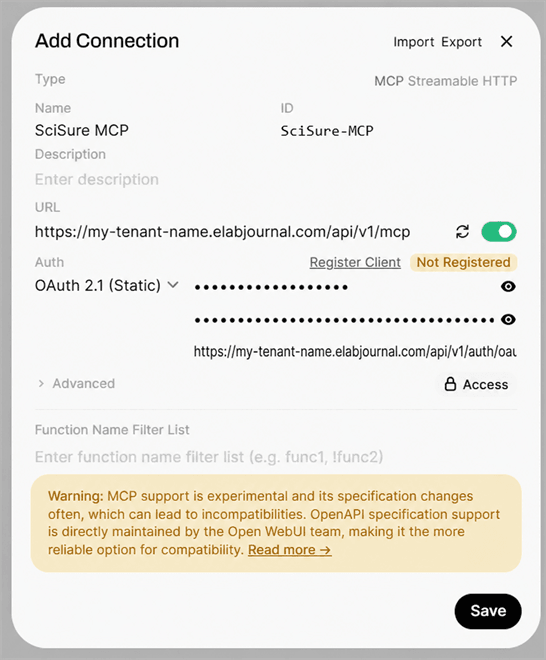
The completed SciSure Research connection before client registration.
Experimental-feature warningOpen WebUI may display a warning that MCP support is experimental. The warning itself does not mean the connection has failed.
5. Verify the endpoint and register the client
Complete the connection in this order so Open WebUI can discover the endpoint and bind it to the OAuth client.
- Select Verify Connection — the refresh icon next to the URL.
- Select Register Client.
- Confirm that the status changes to Registered.
- Select Save.
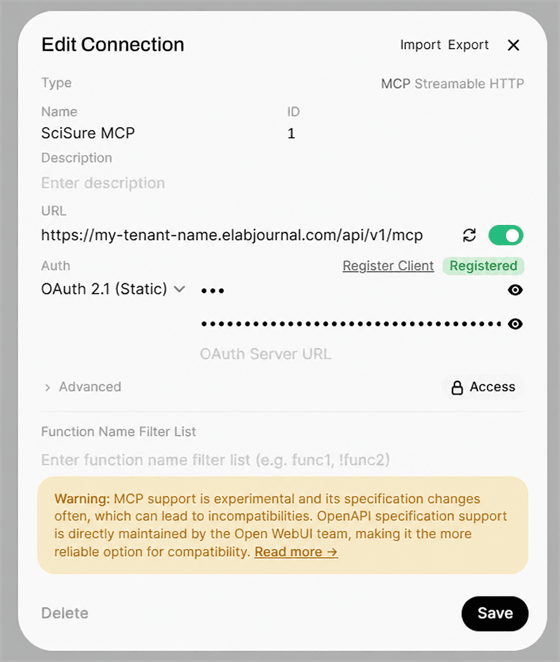
The green Registered state confirms client registration. Keep your own connection ID set toSciSure-MCP, as configured in step 4.
Client registeredWhen the status is Registered and the connection is saved, the SciSure MCP tool is ready to be enabled in a chat.
6. Authenticate from a new chat
Start a new Open WebUI chat, enable SciSure MCP for that chat, and approve the requested access in SciSure Research.
Open the integrations menu
In the prompt bar, select the integrations icon next to the plus button.
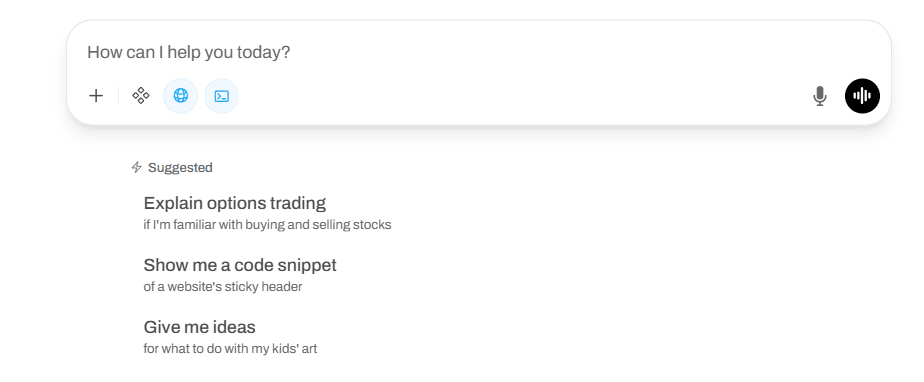
Select the integrations icon in the prompt bar.
Choose Tools
In the integrations menu, select Tools.

Open Tools from the integrations menu.
Enable SciSure MCP
Switch SciSure MCP on. The authentication flow should start automatically.

Enable SciSure MCP for the current chat.
Approve access in SciSure Research
After signing in if prompted, review the application name and requested permissions. If they match the OAuth client created in step 3, select Allow Access.
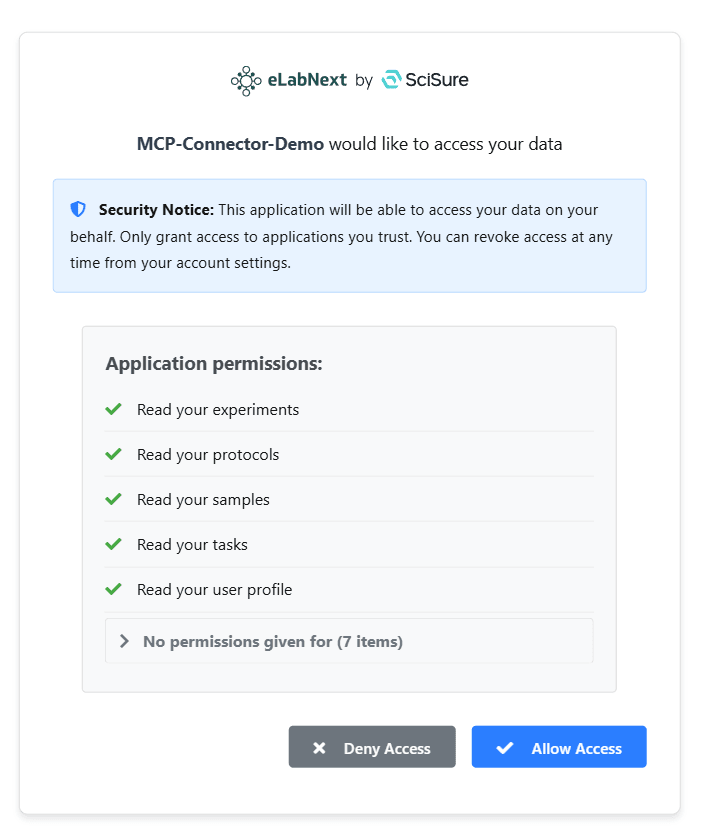
The application name in your environment may differ from this example. Verify the name and permissions before selecting Allow Access.
Check before you allow accessOnly grant access when you recognize the application and the listed permissions match the scopes selected for your OAuth client.
- Return to the Open WebUI chat after authorization completes.
- Ask a question that uses your authorized SciSure Research data.
ConnectedYou are connected. Requests run through the SciSure MCP endpoint using the scopes and access granted to the authenticated user.
Common connection issues
Check these items before recreating the connection.
I cannot add or configure an MCP connection
Confirm that WEBUI_SECRET_KEY is set in the Open WebUI environment and that the service was restarted with the variable available.
SciSure rejects the OAuth callback URL
Compare the registered Redirect URI with the actual Open WebUI URL. The protocol, hostname, port, and mcp:SciSure-MCP segment must match exactly.
Verify Connection does not succeed
Confirm that https://<your-instance>/api/v1/mcp is reachable from the Open WebUI host.
The connection remains Not Registered
Recheck the OAuth Client ID, Client Secret, redirect URI, and read scopes. Then verify the endpoint again before selecting Register Client.
SciSure MCP is not available in my chat
Confirm the connection was saved. Start a new chat, open the integrations menu in the prompt bar, choose Tools, and enable SciSure MCP for that chat.